Lemon Raspberry Layer Cake with Buttercream Frosting

raspberry cake 14

raspberry cake 11

So we realize that Valentine’s Day was three days ago and we’re sharing this pretty pink cake with tiny frosting hearts with you today. Yes, we’re a little delayed in our effort to help you celebrate the big day dedicated to love, but why not celebrate love everyday? You know you agree! Candy hearts and sweets shouldn’t be shared just one day a year!

raspberry cake 12

We made this lemon layer cake with raspberry filling and buttercream frosting this past weekend with our friend, Jen who is an all-star baker and has amazing cake decorating skills. She’s made such creative and fun “smash cakes” (the cakes for kids’ 1st birthdays) for her friends’ and co-worker’s. So, piping little butter cream hearts was a piece of cake for her (pun intended).

raspberry cake 9

We used cream instead of butter, which gives the cake a texture and taste that resembles a short-bread biscuit. The raspberry filling adds a welcomed tart bite that is sweetened by the buttercream frosting. Since we’re girls who like pretty things, we added decorative pearls around the sides.

raspberry cake 13

Life is about celebrating friends, family and love, and making cakes!

Happy double dipping!

*p.s. please excuse the semi-smashed frosting hearts in the pics…the cake got a little messy in the container on the drive home from Jen’s house. That just meant more frosting-licking for us!

 raspberry cake 5


The recipe is inspired by Martha Stewart and Naturally Ella

 Cake

  • 2 cups all-purpose flour (sifted)
  • 1 teaspoon salt
  • 1 cup sugar (1/2 cup plus 1/2 cup)
  • 2 cup heavy cream
  • 2 tablespoons almond milk
  • 2 teaspoons baking powder
  • 4 large egg whites, room temperature
  • 1 teaspoon pure vanilla extract
  • juice of 1 lemon
  • Butter, to grease pan

 Filling

  • 15 ounces raspberries (8 ounces, fresh or frozen)
  • ⅓ cup sugar
  • 3-4 tablespoons corn starch

 Frosting

  • 2 sticks unsalted butter
  • 7-8 cups powdered sugar
  • 1 teaspoons vanilla extract
  • ¼ cup heavy cream
  • ¼ cup raspberry filling

 Instructions

  1. Preheat oven to 325 degrees. Coat 2 9-inch round cake pans with butter. Whisk together flour, salt, and 1/2 cup sugar. In a separate bowl, combine cream, almond milk, baking powder, egg whites, and lemon. Whisk in vanilla.
  1. Fold in flour mixture, then divide among pans. Bake until golden, about 25 minutes. (Each cake layer will be approximately 1/2 inch in height.) Let cool in pans 30 minutes. Remove; let cool completely on a wire rack.
  1. While the cake is baking, prepare raspberry filling. Combine the raspberries in a pot and heat over medium heat until juices have released. Add sugar and stir. In a small bowl, combine the 3 tablespoons cornstarch with ¼ cup warm water, stirring until the starch is dissolved. Add to the pot and stir well. Cook until raspberries have thickened slightly and the cloudiness from the cornstarch has disappeared. Remove from heat and let cool completely. If filling is still too runny, continue to add cornstarch/water mixture 1 tablespoon at a time. Let cool. The filling will thicken while cooling.
  1. For the frosting, beat together butter, 7 cups of powdered sugar, heavy cream, and vanilla. Frosting should still be slightly stiff. Finally, beat in ¼ cup of the cooled raspberry filling.
  1. Spread half the filling over top of 1 cake layer, and sandwich with another layer. Swirl frosting over top and sides of cake. Add sprinkles, pearls, and decorate until your heart’s content!

Apple Pomegranate Galette

 Tart 4 

It snowed! It finally snowed! Which means we’ve been frolicking outside in our mukluk boots, making snow angels, and best of all we got to use the snow blower we got for Christmas from our Big Dipper parents! Does our dad know how to buy gifts for his daughters or what?! A big, mighty, orange snow blower that shoots snow across the yard like a fire breathing dragon is every girl’s dream, really. Snow blower before diamond rings and bling, that’s our new phrase.

Tart 7

The snow blower was a highlight, and we really did have an amazing Christmas spent with friends and family. As always, we indulged in a Scandinavian smorgasbod on Christmas Eve, complete with Swedish meatballs, lefse, pork roast topped with sugary-tart lingonberries, pickled cucumbers, and twice baked potatoes. We love (italicized for emphasis) this meal and love that it does not change from year to year. That’s tradition. The one part that does change is the dessert. Our Mom has made chocolate raspberry pie, fondu, and pear torts in the past. All delicious! This year we were in charge of the dessert. Lots of pressure! But we think we delivered on dessert with this colorful, sweet and tart apple pomegranate galette.

Tart 6

Our Dad said it was the best dessert we’ve ever made! We gave ourselves a little pat on the back for that.

Tart 2

The crust is buttery and flakey. The apples and pomegranates are just tart enough to make your tongue pucker on the first bite. The brown sugar and cinnamon give simple sweetness which provides the perfect counter-balance.

This dessert is a fantastic end to a winter meal shared with friends.

Happy snow frolicking! Happy baking! Happy double dipping!

Tart 8

Apple Pomegranate Galette – adapted from FoodNetwork.com

Ingredients:

For the crust

  • 1 cup whole-grain flour or regular whole wheat flour
  • 2 teaspoons granulated sugar
  • 1/8 teaspoon salt
  • 4 tablespoons cold, unsalted butter, cut into small pieces
  • 5 tablespoons ice water

For the Filling

  • 3 medium Honey Crisp apples (or other variety), unpeeled
  • 1 tablespoon lemon juice
  • 1/2 cup dried pomegranates (divided into two 1/4 cup measurements)
  • 1 tablespoon plus 1 teaspoon cornstarch
  • 3 tablespoons light brown sugar
  • 1/8 teaspoon ground cinnamon

Instructions

To prepare the crust, put the whole-wheat flour, granulated sugar and salt in the bowl of a food processor (we use our Vitamix) and pulse 3 times to combine. Add the butter and pulse about 12 times, until you get a pebbly coarse texture. Add the water and pulse 3 to 5 times more to combine. Pat the dough into a 4-inch round and wrap in plastic wrap. Place in the freezer for 10 minutes, or make ahead and refrigerate for up to 1 day.

In the meantime, preheat the oven to 425 degrees F, and prepare the filling. Core the apples and cut them into 1/4-inch slices. In a large bowl toss the apple slices with the lemon juice. Add half of the pomegranates (1/4 cup), then sprinkle brown sugar and cinnamon and toss until the apples are evenly coated. Set aside.

On a lightly floured surface, roll the chilled dough into a large circle about 9 inches in diameter. Line a baking sheet with parchment paper, and draping the dough over the rolling pin, transfer it to the prepared baking sheet. If the dough breaks (it will likely break and don’t sweat it!), patch it up with your fingers.

Arrange the apple mixture in a mound in the center on the dough, leaving a 1 to 2-inch border. Fold the border over the filling. It will only cover the filling partially and does not need to be even.

Bake the pie at 425 degrees F for 15 minutes, and then reduce the oven temperature to 350 degrees F, keeping the pie in the oven all the while, and bake for another 40 minutes, until the apples are tender and the crust is golden brown.

When the pie is done transfer to a plate to cool slightly. Add the reaming 1/4 cup pomegranates on top. Cut into 6 wedges and serve warm or at room temperature. Enjoy!

Maple Panna Cotta with Sea Salt Blackberries

Maple Panna Cotta

Sometimes we get these brilliant ideas, like an idea to make maple cinnamon gelato. We get super excited, put the jams on loud in the kitchen and whisk away making gelato.

Maple Panna Cotta  

Gelato is complicated if you’ve never made it. It requires patience, attention and finding the balance between different temperature states. If you lose focus and turn away for a moment you’ll end up with scrambled eggs.

Maple Panna Cotta

We ended up with scrambled eggs instead of gelato. Sometimes in the kitchen you just have to let go. Let the scrambled eggs be what you made them to be on move on. The weekend meditation on The Kitchn says this perfectly. We practiced letting go and turned to this easy and delicious panna cottta instead. No eggs required for this!

Maple Panna Cotta

This maple panna cotta was inspired by one of our favorite restaurants, Mill Valley Kitchen. It’s lucious and creamy, tart and tangy, sweet and satly. This dessert has it going on! The base is made with European style yogurt and full fat milk (splurge!). It melts in your mouth and leaves the sweet maple taste on your tongue. But what makes this dessert really pop is the sprinkle of sea salt on top. We can’t take credit for this ingenious idea. Mill Valley Kitchen tops their panna cotta with black sea salt. Divine. Our copy cat recipe is a homage to Mill Valley Kitchen.

So, if you end up with scrambled eggs let it go and make panna cotta. Happy double dipping!

Maple Panna Cotta

Recipe – adapted from A Cozy Kitchen 

Makes 4-6

Ingredients

  • 1 1/2 cups whole milk, divided
  • 1 1/2 teaspoon unflavored gelatin
  • 1 tsp. vanilla
  • 1/2 cup maple syrup (grade A)
  • 1/4 teaspoon salt
  • 2 cups European-style whole milk yogurt

Method

1. In a medium bowl, pour in 1/4 cup milk and stir in the gelatin powder. Set aside for 15 minutes, allowing the gelatin to bloom.

2. Pour in the remaining 1 1/4 cup milk, vanilla and salt in a medium saucepan. Heat over medium-low heat and stir until boiling, about 3-5 minutes.

3. Pour the gelatin/milk mixture into the saucepan with the milk/sugar mixture and stir until smooth, about 1 minute. Transfer to the bowl (you can use the bowl where the milk and gelatin were) and allow the mixture to cool to a lukewarm temperature. Whisk in the yogurt (it’ll be lumpy at first – just keep whisking) and mix until smooth.

4. Divide the panna cotta between ramekins. (We filled 4 ramekins, but if you use smaller ones, you can get enough for 6.) Transfer the panna cotta to the refrigerator and chill until firm, at least 6 hours, but ideally overnight. Since there isn’t THAT much gelatin in this, overnight is preferred.

Salted Honey Ice Cream S’mores

Salted Honey Ice Cream S'mores

We made the ultimate summer treat…salted honey ice cream s’mores. You can thank us later as you are licking the sweet, melted ice cream off your fingers and wiping the smudged chocolate off your face.

Salted Honey Ice Cream S'mores

This treat was inspired by our long, deep love for both s’mores and ice cream. The gooey marshmallow and melty chocolate squished between two crunchy grahams is irresistible. The cool, sugary ice cream is our go-to on a steamy summer day. Rather than choose one or the other, we ingeniously combined the two.

The salted honey ice cream mimics the marshmallow. The chocolate is layered on the outside of the graham and is sprinkled with sea salt. Sweet meet salty. Who can resist it?

Salted Honey Ice Cream S'mores

These ice cream sandwiches are everything summer should be. Happy double dipping!

Recipe

Ingredients

  • 16 honey graham crackers (we used Honey Maid)
  • 1 cup semi-sweet chocolate chips
  • 1 cup milk (we used 1%, but 2% or whole milk would be delicious as well)
  • 1/2 cup buttermilk
  • 1/2 cup heavy cream
  • 1/4 cup honey
  • 1 tsp. sea salt, plus more for sprinkling graham crackers
  • 1/2 tsp. vanilla extract (a vanilla bean would be a great, fresh alternative as well)

Method

Making the salted honey ice cream:

1. Combine milk, buttermilk, heavy cream, honey, vanilla, and sea salt in a blender and process until all ingredients are fully incorporated. Chill mixture in refrigerator for 30 minutes.

3. Process mixture in an ice cream maker according to manufacturer’s instructions.

4. Transfer sherbet to an airtight container and freeze until ready to serve.

Double Dipper Tip: To prevent the ice cream from become icy we learned you should store the sherbet in a low, long airtight rectangular container. This increases the surface area of the sherbet, preventing ice from forming easily. Also, make sure you spread the sherbet evenly in the container to prevent ice from forming.

Making the chocolate covered graham crackers:

1. Melt 1 cup of dark chocolate chips using a double boiler. We made this dessert at our cabin, where we do not have a double boiler and if you find yourself in a similar position here is an alternative method.

Bring a pot of water to a boil over the stove. Place a shallow glass dish in the boiling water and pour the chocolate chips into the glass bowl. Reduce heat to low and stir chocolate until it is creamy and smooth.

2. Break each graham cracker in half (you should have 32 squares). Dip half of each square in melted chocolate and place on a freezer-safe dish lined with parchment paper. Sprinkle each square with sea salt.

3. Freeze graham crackers in freezer for at least 30 minutes, or until chocolate hardens.

Assembling the ice cream S’more:

1.  Spoon 1 scoop (about 1 Tbsp.) ice cream on graham cracker half. Place the other half on top, pressing down slightly. Repeat for remaining graham crackers.

2. Freeze ice cream s’mores for at least one hour before serving.

3. Serve as a cool treat and enjoy!

Chocolate Coconut Avocado Mousse

OLYMPUS DIGITAL CAMERA

It’s spring break time! Do you have a trip planned to escape to a tropical oasis? Or are you like us and still shivering in the freezing cold? We’re not spring breaking it this year…reality of being working girls. But we are dying for some vitamin D and a taste of the tropics. So last weekend we escaped to a sweet retreat with this chocolate coconut avocado mousse, served in a margarita glass and enjoyed while relaxing with friends and listening to the island tunes of Jimmy Buffet. We were truly in Margaritaville.  

OLYMPUS DIGITAL CAMERA

This mousse is so easy to whip up and can be made a few days ahead of time making it the perfect dessert when hosting a party. Don’t be scared by the avocado. It provides silky, smooth texture without being overwhelming in flavor. The chocolate, cinnamon, and coconut milk are the flavor stars here.


OLYMPUS DIGITAL CAMERA

Now for presentation…we got kind of fancy here and served the mousse in margarita glasses. We also added some goodies. You can see the raspberry, dark chocolate chips, and chopped almonds on top, but there’s a surprise at the bottom of the glass. No, not tequila although that is an awesome idea! More dark chocolate chips and raspberries! Our friends loved the surprise. One of them even said she had been saving the raspberry to eat with the last bite and was ecstatic that more awaited! It’s so much fun to surprise your friends!

So if you’re itching for the tropics, invite your friends over, jam out to Jimmy Buffet, and make this mousse. Happy double dipping!

OLYMPUS DIGITAL CAMERA

Recipe

Serves 6

Ingredients

  • 4 ripe avocados
  • 2 ripe bananas
  • 1 cup coconut milk
  • 6 tbsp. coco powder
  • 1 tbsp. honey
  • 2 vanilla beans or 1 tsp. vanilla
  • 2 tsp. cinnamon
  • 1 handful raspberries (for topping)
  • ¼ cup chopped almonds (for topping)
  • 1-2 handful dark chocolate chips (for topping)
  • 6 margarita glasses (for serving)

Method

  1. In a food processor (we used our VitaMix) combine avocado and coconut milk; process until smooth.
  2. Add remaining ingredients and continue to blend until thick and creamy. Stop occasionally to make sure all ingredients are being fully incorporated, scraping down sides as needed.
  3. Place a few raspberries and dark chocolate chips in the bottom of each margarita glass. Evenly divide mousse between 6 glasses. Garnish with a raspberry, a few chocolate chips and a sprinkle of chopped almonds.
  4. Store in refrigerator for at least 30 minutes or until ready to serve. Mousse can be made up to 3 days before serving.
  5. Savor each bite and enjoy!

Orange Gingerbread Cake with Cream Cheese Frosting

OLYMPUS DIGITAL CAMERA

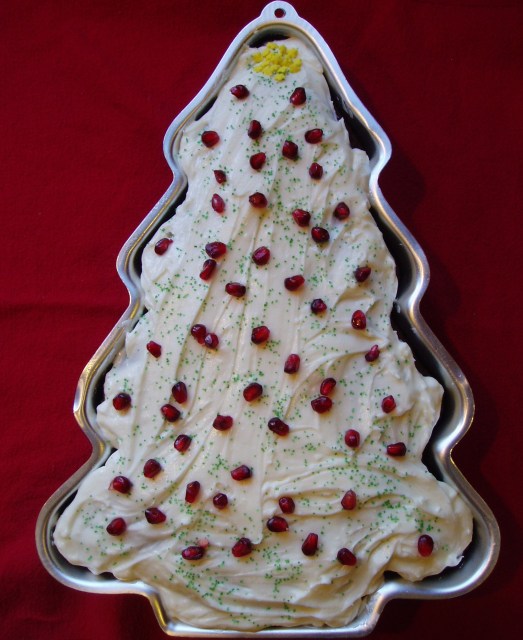
Merry Christmas Eve to all! We wanted to share one last treat with you before the big dance tomorrow, Christmas day! This year we are going over to our uncle’s house to celebrate Christmas with family and of course…food. We were asked to bring a dessert to share and saw this to-die-for orange gingerbread cake with cream cheese frosting on Joy the Baker and knew our little cousins (and big uncles) would eat this right up. As we were digging through the cupboard for the 8×8 baking pan we came across the perfect cake pan. Yes, what you see featured above is a cake pan in the shape of a Christmas tree! Cake in the shape of a Christmas tree is infinitely better than cake in a regular shaped pan. Ok, you can’t really taste a difference so don’t fret, you won’t have a blue Christmas if you must resort to using a normal cake pan. We decorated the tree with pomegranates and green sprinkles and topped it with a yellow star. This gingerbread cake tastes and looks like Christmas. So, if you’re searching for one more treat to bake this orange gingerbread cake with cream cheese frosting is the winner.

Recipe

Orange Gingerbread Cake with Cream Cheese Frosting – adapted from joythebaker.com

makes 9 generous pieces in an 8×8-inch square pan

Ingredients

For the Cake:

  • 2 1/4 cups all-purpose flour
  • 2 teaspoons ground ginger
  • 1 teaspoon ground cinnamon
  • 1/4 teaspoon ground cloves
  • 1 3/4 teaspoons baking soda
  • 1/2 teaspoon salt
  • 3/4 cup plus 2 tablespoons vegetable oil
  • 3/4 cup granulated sugar
  • 2 large eggs
  • 3/4 cup unsulphered molasses (not blackstrap)
  • 1/4 cup honey
  • 2 teaspoons orange zest
  • 3/4 cup warm water

For the Cream Cheese Frosting:

  • 1 block (8 ounces) cream cheese frosting, softened
  • 1/2 cup (1 stick, 4 ounces) unsalted butter, at room temperature
  • big pinch of salt
  • 2 cups powdered sugar, sifted
  • 2 teaspoons pure vanilla extract (plus half of a scraped vanilla bean if you’d like)
  • pomegranate seeds for garnish

Method

  1. Place a rack in the upper third of the oven and preheat oven to 350 degrees F.  Grease an 8×8-inch square (or 9-inch round) baking pan.  Line with parchment paper and grease and flour the parchment paper.  The parchment paper isn’t entirely necessary, it just makes the cake easier to remove from the pan.  Set pan aside.
  2. In a medium bowl, whisk together flour, spices, baking soda, and salt.  Set aside.
  3. In a large bowl whisk together vegetable oil, sugar, and eggs until thick and pale.  Stir in molasses, honey, and orange zest.
  4. Add the dry ingredients, all at once, to the wet ingredients.  Stir together until entirely incorporated.  Add the warm water and gently stir until entirely incorporated and the mixture is silky smooth.
  5. Pour the batter into the prepared pan.  If you find that the mixture fills the pan more than three-quarters of the way full, you might consider using a larger pan (a 9 or 10-inch pan may serve your better).
  6. Bake cake for 35-45 minutes, or until a cake tester inserted into the center of the cake comes out clean.
  7. While the cake bakes, make the cream cheese frosting.In the bowl of an electric stand mixer fitted with a paddle attachment, blend the cream cheese (yea… just the cream cheese) on medium speed.  The cream cheese should be as soft and smooth as possible.  Stop the mixer.  Add the softened butter.  Scraped down the sides of the bowl and beat the two together over medium speed until smooth and incorporated.  Add one cup of powdered sugar.  Blend until incorporated.  Add vanilla extract (and bean, if using) and remaining cup of powdered sugar.  Beat on medium high speed until frosting is smooth and silky.
  8. Allow cake to cool in the pan for 20 minutes.  Remove and allow to cool completely on a wire rack before frosting the cake.  Sprinkle with pomegranate seeds before serving.
  9. Serve as a Christmas treat and enjoy!

*This cake can be stored, well wrapped in the refrigerator, for up to 3 days.  


Loaded Holiday Apple Oatmeal Raisin Cookies

OLYMPUS DIGITAL CAMERA


Oh the weather outside is frightful! (15 inches of snow!) But the cookies are so delightful. And since we’ve no place to go, bake the cookies, eat the cookies, let it snow! (and eat the cookies some more) 

OLYMPUS DIGITAL CAMERA

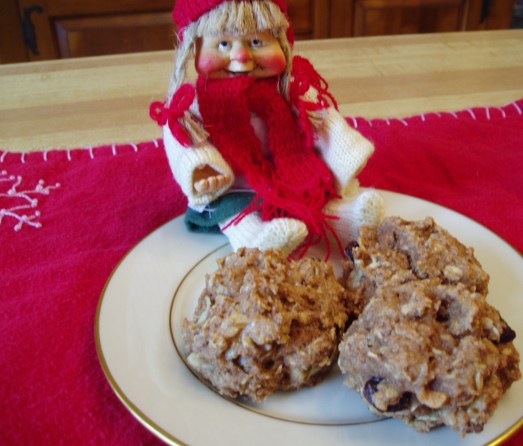
15 inches of snow means it’s time to turn on the oven and bake up some holiday cheer! We sang along with Bing Crosby and made these delightful loaded holiday apple oatmeal raisin cookies with toasted walnuts and sweetened with maple syrup. That is holiday cheer in the form of a cookie.  


OLYMPUS DIGITAL CAMERA


Norwegian Babushka agrees. She devoured a few…or was that us?

OLYMPUS DIGITAL CAMERA

So as you are warm and cozy inside your home and avoiding shoveling your driveway, (because really, what is the point of shoveling if you have an amazing neighbor who will do it for you if you wait just long enough?) make some cookies for yourself…and to share with your kind neighbor.

Happy snow. Happy double dipping!

OLYMPUS DIGITAL CAMERA

Recipe

Makes 13 cookies

Ingredients

  • 1 cup whole wheat flour
  • ½ rolled oats
  • ¾ tsp. baking powder
  • ¼ tsp. salt
  • ¾ tsp. cinnamon
  • ½ tsp. nutmeg
  • ½ tsp. ginger
  • ½ cup chopped walnuts
  • 1/3 cup raisins
  • 3 tbsp. vegetable oil
  • ¼ cup apple sauce (or 1 medium apple)*
  • 1 tsp. vanilla
  • ½ cup maple syrup

*We made our own apple sauce. See below for method.

Method

  1. Pre-heat oven to 325 degrees F.
  2. Peel and chop apple, and sprinkle with cinnamon. In a medium sauce pan over low heat, simmer apple slices until soft. Place in food processor (or blender) and process until smooth, leaving some chunks.
  3. In a large bowl combine dry ingredients.
  4. In a medium bowl combine wet ingredients.
  5. Add wet ingredients to dry ingredients and mix together.
  6. Using a spoon (or your hands), form dough into 13 round balls and place on baking sheet.
  7. Bake in oven for 14-15 minutes.
  8. Serve with holiday spirit and enjoy!

Sweet Potato Spice Scuffies (Scone/Muffin/Cookie combo)

There we go putting vegetables in our desserts again. Remember our dark chocolate beet cupcakes? In those bad boys we hid the vegetable and made the chocolate the star. Not so this time. The creamy sweet, sweet, sweet potato is the big Kahuna of this dessert.

What is this dessert? A scone…not quite. A muffin…nope. A cookie…close but no cigar. It’s a SCUFFIE! The hybrid of all three (SCone mUFF cookIE).

We recently went shopping at CostCo and came home with a gigantic crate of sweet potatoes (#sweetpotatoproblems). After some creative brainstorming, the solution hit us in the face. We adjusted our mini-scone recipe to incorporate sweet potatoes. We thought we would end up with the same texture as the mini scones. But our minds (and mouths) were blown! The sweet potato made these treats light and fluffy like a scone, moist like a muffin top, and bite size like a cookie. Hence, this was a scuffie.

Scuffies are a party in your mouth. There’s cinnamon and nutmeg, hints of maple syrup, treasures of dark chocolate chips, and of course sweet potato. So put on your party hat, invite your friends over and make some scuffies.

Happy double dipping!

Recipe – a Double Dipper Original

Makes a Baker’s Dozen “Scuffies”

Ingredients

  • ¾ cup peeled, mashed sweet potato (we used 2 large sweet potatoes)
  • 1 ¾ cup spelt flour
  • 1 ½ tsp. baking powder
  • ¾ tsp. baking soda
  • 1 tsp. salt
  • 1 tsp. vanilla extract
  • 1 tbsp. 1% milk
  • ½ tsp. apple cider vinegar
  • 1 tbsp. brown sugar
  • ¼ cup pure maple syrup
  • ¼ cup dark chocolate chips
  • 1 tsp. cinnamon
  • ½ tsp. ground nutmeg
  • ¼ tsp. ground cloves

Method

  1. Pre-heat oven to 375 degrees F. Line baking sheet with parchment paper or a non-stick mat.
  2. Peel sweet potatoes and boil until soft enough to mash. Thoroughly mash or puree the sweet potatoes until there are no chunks.
  3. In a small bowl mix the apple cider vinegar and milk, and set aside for a couple minutes until it curdles.
  4. In a large bowl mix together the wet ingredients (vanilla extract, maple syrup, apple cider vinegar + milk mixture)
  5. In another bowl mix together the dry ingredients (flour, baking powder, baking soda, salt and brown sugar).
  6. Add the dry ingredients to the wet and mix well. Fold in the sweet potato puree. Then, fold in dark chocolate chips. We found that it was best to combine the ingredients using our hands.
  7. Scoop batter onto baking sheet so that each scuffie is about 1 ¼ inch in diameter. They’ll expand in the oven.
  8. Bake for about 12-15 minutes until golden brown.
  9. Enjoy with a hot cup of coffee or apple cider. Enjoy!

Dark Chocolate Coffee Mini Scones


Delightful clouds of sweet chocolate coffee joy in your mouth. That’s what these light and fluffy dark chocolate coffee mini scones are!


It has been a lazy and chilly Saturday afternoon and these gooey, comforting scones were the perfect treat to provide some warmth. And after our grueling work-out this morning (we’re training for the Twin Cities Monster Dash on October 27th), we thought we deserved (and needed) some extra fuel in the form a baked good.

We adapted this recipe from a blog that we really enjoy reading, ohsheglows.com. It called for spelt flour and although we’ve never baked with this type of flour before we thought we’d give it a whirl. Spelt flour is a whole grain and has more protein than wheat flour. Extra fuel! Another crazy twist to this recipe is curdled milk. Quick science lesson (we are the daughters of a chemistry teacher after all). pH measures how acidic a substance is. In normal conditions milk has a pH of about 6.5, meaning it’s just slightly acidic. But when you add apple cider vinegar which has a pH of 4.25 (much more acidic), the pH falls and the protein structure of the milk changes, causing the milk to curdle.

Why use curdled milk in baking? Sour curdled milk in your refrigerator is disgusting. But the curdled milk that we made as part of the batter gives the scones a moist and fluffy texture. Chemistry is awesome!

So put your lab coat on (or apron if you prefer), and curl up with these dark chocolate coffee mini scones! Happy double dipping!

Recipe – adapted from ohsheglows.com

Makes 15 mini scones

Ingredients

  • 1 ¾ cups spelt flour (or whole wheat pastry flour or all-purpose flour)
  • 1 ½ tsp. baking powder
  • ¾ tsp. baking soda
  • 1 tsp. salt
  • 1 tbsp. sugar
  • 1 tsp. pure vanilla extract
  • ¼ cup canola oil
  • ¼ cup pure maple syrup
  • 1/3 cup very strong coffee
  • 1 tsp. apple cider vinegar
  • 1 tbsp. 1% milk
  • ½ cup + 2 tbsp. dark chocolate chips

Method

  1. Pre-heat oven to 375 degrees F. Line baking sheet with parchment paper or a non-stick mat.
  2. In a small bowl mix the apple cider vinegar and milk, and set aside for a couple minutes until it curdles.
  3. In a large bowl mix together the wet ingredients (oil, vanilla extract, coffee, maple syrup, apple cider vinegar + milk mixture)
  4. In another bowl mix together the dry ingredients (flour, baking powder, baking soda, salt and sugar).
  5. Add the dry ingredients to the wet and mix well. Fold in the dark chocolate chips.
  6. Scoop about 1 tbsp. of batter per mini scone onto baking sheet.
  7. Bake for about 12 minutes until golden brown.
  8. Enjoy with a hot cup of coffee or apple cider. Enjoy!

Your Mom’s Apple Crisp

Growing up apple crisp was always a Sunday night treat, especially in the fall. After an afternoon of running around collecting logs for our “house” that we were building in the back woods, running through the swamp to get “ingredients” for the pond soup we were going to cook, and chasing after bugs in the mud, we would come back inside to the heavenly aroma of apple crisp baking in the oven. Our mom was (and still is) pretty awesome.

Today, we made the apple crisp for Mom. We used honey crisp apples…

And got to use a super fun kitchen gadget! The apple corer! Not only does this bad boy peel and core the apple…

…it slices it into bouncy rings! We may have each sneaked an accordian apple into our mouths while making the crisp. (Not the whole thing at once though. We’ve been told we have big mouths, but not big enough to fit an entire apple!)

If you’re longing for that feel good, Mom-made dessert, this is the perfect treat. Happy double dipping!

Recipe- adapted from the Betty Crocker Cook Book

Serves 8-10

Ingredients

  • 6 medium honey crisp apples, cored, peeled and sliced
  • 3/4 cup oats
  • 1/2 cup brown sugar
  • 4 Tbsp. melted butter
  • 2 Tbsp. honey
  • 2 tsp. cinnamon
  • 1 tsp. nutmeg

Method

1. Preheat oven to 375 degrees F.

2. Core, peel, and slice apples.

3. In a medium bowl, combine oats, brown sugar, melted butter, cinnamon and nutmeg to make the crumble topping.

4. Layer apples in a greased 8×12 baking pan. Sprinkle crumble evenly on top.

5. Bake in oven for 30-35 minutes.

6. Serve with vanilla ice cream. Enjoy!